这篇文章是一篇教学文章,在我的网站进行新升级后我会在这里长期更新我所实现的效果。如果你有问题可以在文章末尾的评论区进行提问,我会尽快回复。
请注意,当你改动任何配置文件前请务必进行备份操作,这是一种保障也是一个良好的运维习惯。
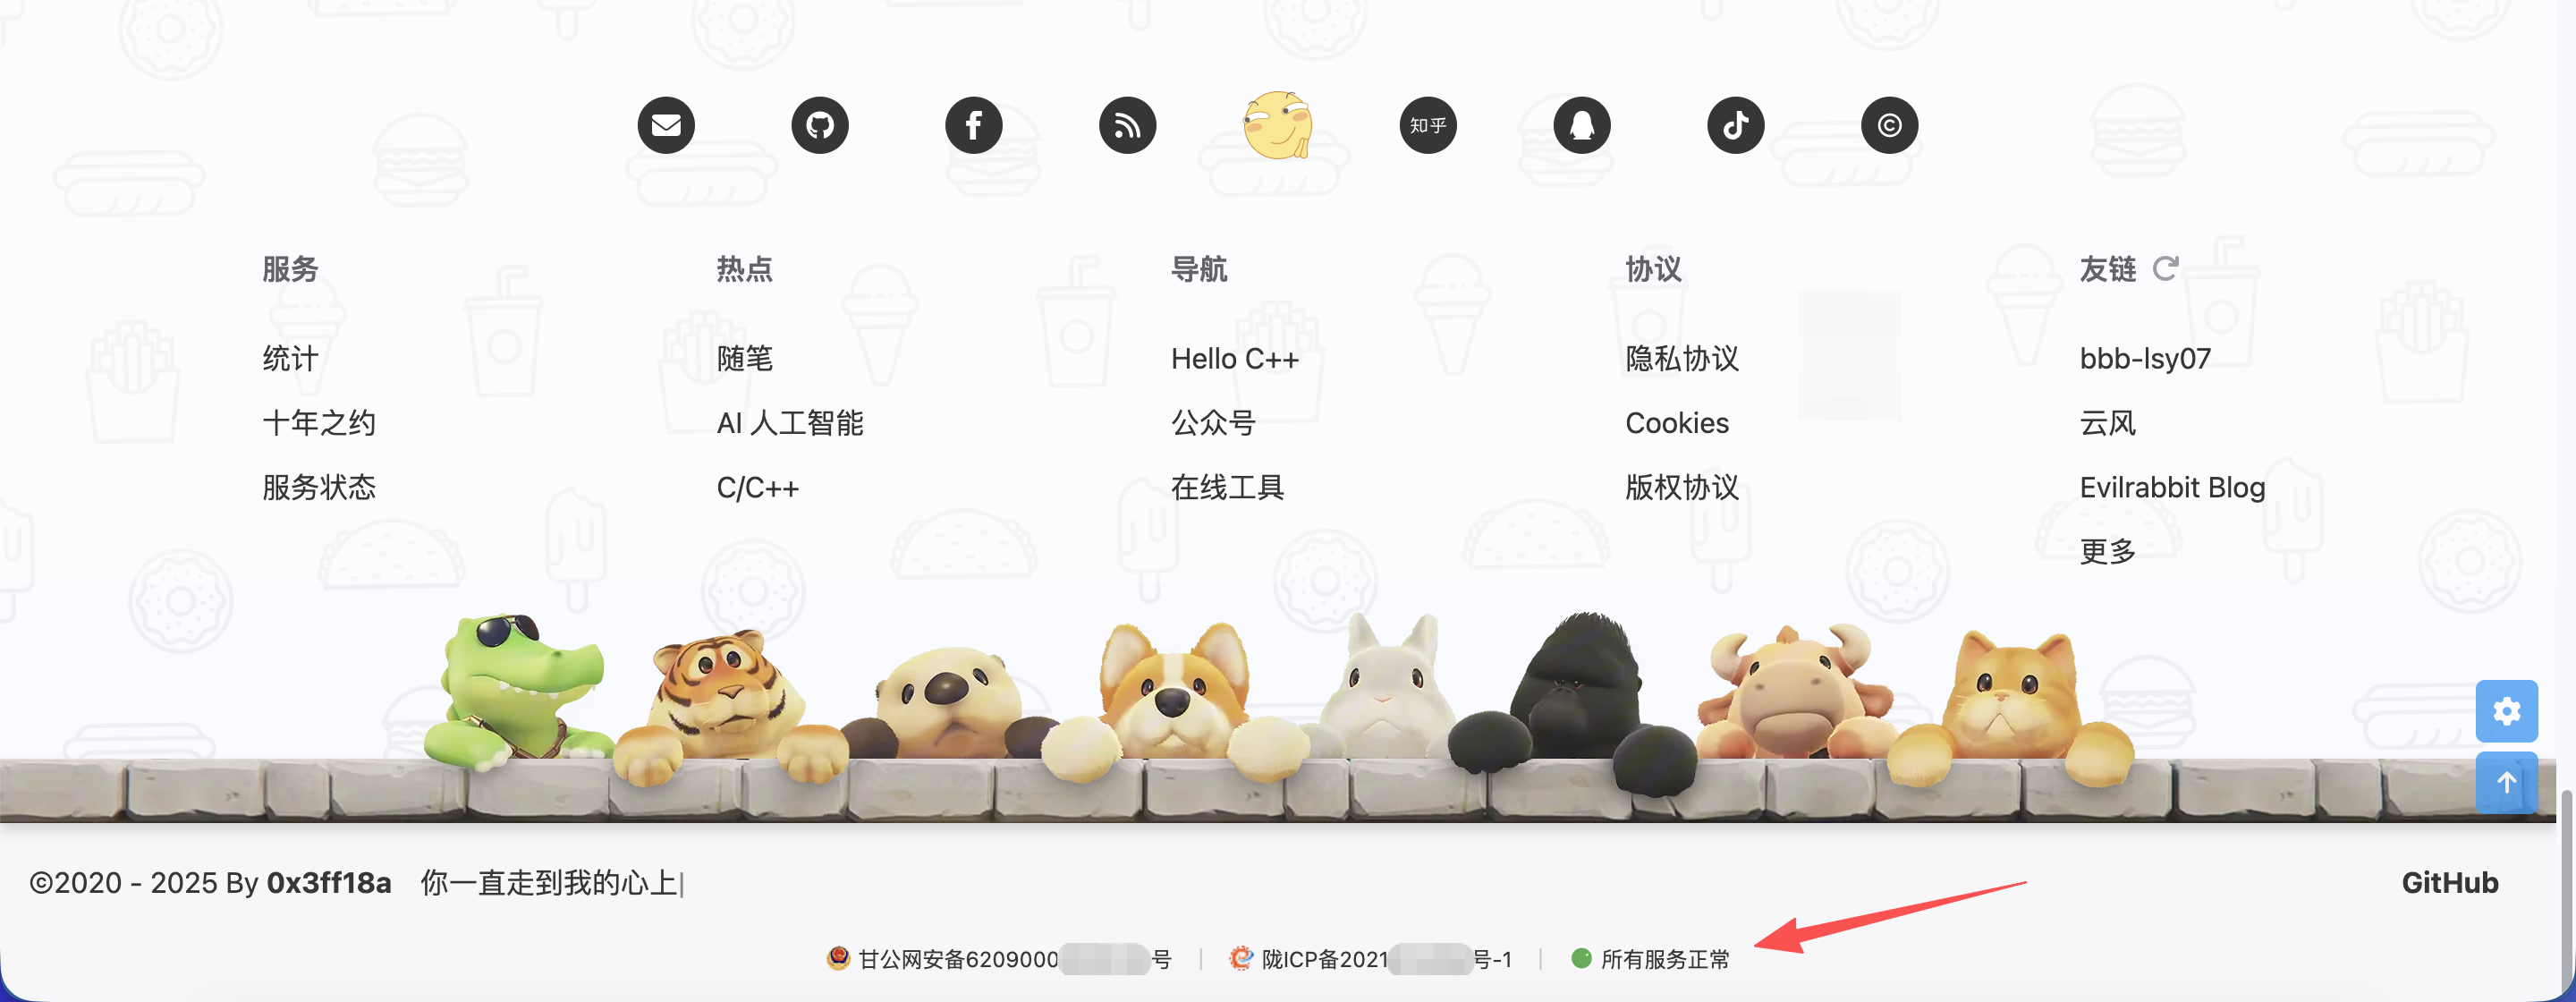
1.页脚添加备案号
1.0 效果图
1.1 添加 _config.yml 字段
在博客根目录 Hexo 的配置文件(_config.yml)中添加如下新键值(这里要注意,是 Hexo 的配置文件,不是安知鱼主题的配置文件!):
1
2
3
|
icp: 填写 ICP 备案号
gb: 填写公网安备号
|
1.2 添加、引用 CSS
完成了第 1 步后我们需要为页脚容器进行样式定义。在博客的 /source/ 目录中的 css 文件夹中创建一个名为 coustom.css 的文件(如果你没有 css 文件夹可以自行创建一个)。
在新建的 custom.css 文件中添加如下代码:
1
2
3
4
5
6
7
8
9
10
11
12
13
14
15
16
17
18
19
20
21
22
23
24
25
26
27
28
29
30
31
32
33
34
35
36
37
38
39
40
41
42
43
44
45
46
47
48
49
50
51
52
53
54
55
56
57
58
59
60
61
62
63
64
65
66
67
68
69
70
71
72
73
74
75
76
77
78
79
80
81
82
83
84
85
86
87
88
89
90
91
92
93
94
95
96
97
|
#footer-bar {
min-height: 100px;
padding-bottom: 50px;
}
#beian-links {
position: absolute;
bottom: 15px;
left: 50%;
transform: translateX(-50%);
display: block;
width: auto;
text-align: center;
white-space: nowrap;
font-size: 12px;
color: var(--anzhiyu-fontcolor);
line-height: 1.5;
font-family: -apple-system, BlinkMacSystemFont, "Segoe UI", Roboto, sans-serif;
z-index: 10;
}
#beian-links a.footer-bar-link {
color: var(--anzhiyu-fontcolor);
text-decoration: none;
transition: color 0.3s ease;
}
#beian-links a.footer-bar-link:hover {
text-decoration: none;
color: var(--anzhiyu-lighttext);
}
@media (max-width: 768px) {
#beian-links {
margin: -30px 0;
font-size: 11px;
white-space: normal;
text-align: center;
max-width: 90%;
bottom: 10px;
display: block;
}
#beian-links a.footer-bar-link {
display: inline-block;
line-height: 1.8;
padding: 2px 4px;
}
#beian-links .separator {
display: none !important;
}
}
[data-theme="dark"] #beian-links a.footer-bar-link {
color: var(--anzhiyu-fontcolor);;
}
[data-theme="dark"] #beian-links a.footer-bar-link:hover {
color: var(--anzhiyu-lighttext);
text-decoration: none;
}
#beian-links .separator {
color: #CCCCCC;
margin: 0 10px;
display: inline-block;
}
[data-theme="dark"] #beian-links .separator {
color: #666666;
}
|
添加好后记得保存修改的文件。此外还需要在安知鱼主题的配置文件 inject -> head 处进行自定义 css 的引入工作:
1
| - <link rel="stylesheet" href="/css/custom.css">
|
紧接着我们需要修改模板引擎,这里特别要注意缩进,Pug 的缩进至关重要,它直接决定了代码能否正确运行以及最终生成的HTML结构。如果你不确定缩进是否正确,最简单的办法,就是在 footer.pug 代码的最底部回车两个空行,然后将输入光标删除到最前端(没有缩进)的地方,复制下面的代码,然后将代码的第一行 #footer-wrap 删除掉。删除掉后不要动下面的代码,直接将空行全部删除即可。
1
2
3
4
5
6
7
8
9
| #footer-wrap // 这行最后一定要删除
#beian-links
a.footer-bar-link(href="#修改为你的链接" target="_blank" rel="nofollow noopener")
img.beian-icon(src="#修改为你的图片" alt="公网安备图标" style="width: 14px; height: 14px; vertical-align: -2px; margin-right: 4px;")
| #{config.gb}
span.separator |
a.footer-bar-link(href="https://beian.miit.gov.cn/" target="_blank" rel="nofollow noopener")
img.beian-icon(src="#修改为你的图片" alt="备案图标" style="width: 14px; height: 14px; vertical-align: -2px; margin-right: 4px;")
| #{config.icp}
|
处理好缩进后我们需要将代码中的链接、图片链接进行替换,替换成为你自己的链接和图片,替换后保存。
1.4 结束语
最后 Hexo 三连(hexo cl && hexo g && hexo s)就可以在页面底部查看效果了,这个 css 进行了响应式适配,移动端也可以很好的展示。
2.添加边栏日历卡片(单卡片风格)
好久不见,I’m back,前段时间去海南出了趟差,又正好赶上大学生们的期末周,手上单子也比较多,没顾得上更新本文,今天终于忙里偷闲,回来更新一下。
今天给大家带来一个我很喜欢的边栏卡片,这个卡片我最早是借鉴一个博主的(但时间太久我找不到他的原文了,希望看到能评论一下,我会链接到原文,感谢这位匿名博主)。网上有很多日历小卡片,但我发现它们都是把 css 单拎出来了,这样我们就需要修改 js、css、yaml and config 四个文件了,但这次介绍这个方法只需要修改三个文件,他将 js 和 css 写到一块了,对于我来说极大的降低了维护成本,而且他的这个风格也很简约。我现在将这个方案分享给大家。
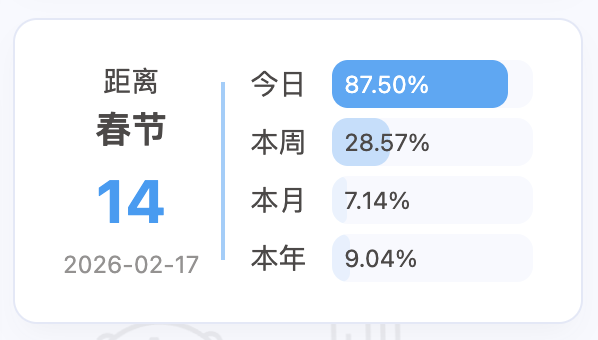
2.0 效果图
2.1 添加、引用 JavaScript
首先我们需要为日历卡片进行样式逻辑实现和样式定义。在博客的 /source/ 目录中的 js 文件夹中创建一个名为 countdown.js 的文件(如果你没有 js 文件夹可以自行创建一个)。
在新建的 countdown.js 文件中添加以下代码(含样式实现,无需另外添加新 css 文件):
1
2
3
4
5
6
7
8
9
10
11
12
13
14
15
16
17
18
19
20
21
22
23
24
25
26
27
28
29
30
31
32
33
34
35
36
37
38
39
40
41
42
43
44
45
46
47
48
49
50
51
52
53
54
55
56
57
58
59
60
61
62
63
64
65
66
67
68
69
70
71
72
73
74
75
76
77
78
79
80
81
82
83
84
85
86
87
88
89
90
91
92
93
94
95
96
97
98
99
100
101
102
103
104
105
106
107
108
109
110
111
112
113
114
115
116
117
118
119
120
121
122
123
124
125
126
127
128
129
130
131
132
133
134
135
136
137
138
139
140
141
142
143
144
145
146
147
148
149
150
151
152
153
154
155
156
157
158
159
160
161
162
163
164
165
166
167
168
169
170
171
172
173
174
175
176
177
178
179
180
181
182
183
184
185
186
187
188
189
190
191
192
193
194
195
196
| const CountdownTimer = (() => {
const config = {
targetDate: "2026-02-17",
targetName: "春节",
units: {
day: { text: "今日", unit: "小时" },
week: { text: "本周", unit: "天" },
month: { text: "本月", unit: "天" },
year: { text: "本年", unit: "天" }
}
};
const calculators = {
day: () => {
const hours = new Date().getHours();
return {
remaining: 24 - hours,
percentage: (hours / 24) * 100
};
},
week: () => {
const day = new Date().getDay();
const passed = day === 0 ? 6 : day - 1;
return {
remaining: 6 - passed,
percentage: ((passed + 1) / 7) * 100
};
},
month: () => {
const now = new Date();
const total = new Date(now.getFullYear(), now.getMonth() + 1, 0).getDate();
const passed = now.getDate() - 1;
return {
remaining: total - passed,
percentage: (passed / total) * 100
};
},
year: () => {
const now = new Date();
const start = new Date(now.getFullYear(), 0, 1);
const total = 365 + (now.getFullYear() % 4 === 0 ? 1 : 0);
const passed = Math.floor((now - start) / 86400000);
return {
remaining: total - passed,
percentage: (passed / total) * 100
};
}
};
function updateCountdown() {
const elements = ['eventName', 'eventDate', 'daysUntil', 'countRight']
.map(id => document.getElementById(id));
if (elements.some(el => !el)) return;
const [eventName, eventDate, daysUntil, countRight] = elements;
const now = new Date();
const target = new Date(config.targetDate);
eventName.textContent = config.targetName;
eventDate.textContent = config.targetDate;
daysUntil.textContent = Math.round((target - now.setHours(0,0,0,0)) / 86400000);
countRight.innerHTML = Object.entries(config.units)
.map(([key, {text, unit}]) => {
const {remaining, percentage} = calculators[key]();
return `
<div class="cd-count-item">
<div class="cd-item-name">${text}</div>
<div class="cd-item-progress">
<div class="cd-progress-bar" style="width: ${percentage}%; opacity: ${percentage/100}"></div>
<span class="cd-percentage ${percentage >= 46 ? 'cd-many' : ''}">${percentage.toFixed(2)}%</span>
<span class="cd-remaining ${percentage >= 60 ? 'cd-many' : ''}">
<span class="cd-tip">还剩</span>${remaining}<span class="cd-tip">${unit}</span>
</span>
</div>
</div>
`;
}).join('');
}
function injectStyles() {
const styles = `
.card-countdown .item-content {
display: flex;
}
.cd-count-left {
position: relative;
display: flex;
flex-direction: column;
margin-right: 0.8rem;
line-height: 1.5;
align-items: center;
justify-content: center;
}
.cd-count-left .cd-text {
font-size: 14px;
}
.cd-count-left .cd-name {
font-weight: bold;
font-size: 18px;
}
.cd-count-left .cd-time {
font-size: 30px;
font-weight: bold;
color: var(--anzhiyu-main);
}
.cd-count-left .cd-date {
font-size: 12px;
opacity: 0.6;
}
.cd-count-left::after {
content: "";
position: absolute;
right: -0.8rem;
width: 2px;
height: 80%;
background-color: var(--anzhiyu-main);
opacity: 0.5;
}
.cd-count-right {
flex: 1;
margin-left: .8rem;
display: flex;
flex-direction: column;
justify-content: space-between;
}
.cd-count-item {
display: flex;
flex-direction: row;
align-items: center;
height: 24px;
}
.cd-item-name {
font-size: 14px;
margin-right: 0.8rem;
white-space: nowrap;
}
.cd-item-progress {
position: relative;
display: flex;
flex-direction: row;
align-items: center;
justify-content: space-between;
height: 100%;
width: 100%;
border-radius: 8px;
background-color: var(--anzhiyu-background);
overflow: hidden;
}
.cd-progress-bar {
height: 100%;
border-radius: 8px;
background-color: var(--anzhiyu-main);
}
.cd-percentage,
.cd-remaining {
position: absolute;
font-size: 12px;
margin: 0 6px;
transition: opacity 0.3s ease-in-out, transform 0.3s ease-in-out;
}
.cd-many {
color: #fff;
}
.cd-remaining {
opacity: 0;
transform: translateX(10px);
}
.card-countdown .item-content:hover .cd-remaining {
transform: translateX(0);
opacity: 1;
}
.card-countdown .item-content:hover .cd-percentage {
transform: translateX(-10px);
opacity: 0;
}
`;
const styleSheet = document.createElement("style");
styleSheet.textContent = styles;
document.head.appendChild(styleSheet);
}
let timer;
const start = () => {
injectStyles();
updateCountdown();
timer = setInterval(updateCountdown, 600000);
};
['pjax:complete', 'DOMContentLoaded'].forEach(event => document.addEventListener(event, start));
document.addEventListener('pjax:send', () => timer && clearInterval(timer));
return { start, stop: () => timer && clearInterval(timer) };
})();
|
添加好后记得保存修改的文件。此外还需要在安知鱼主题的配置文件 inject -> bottom 处进行自定义 js 的引入工作:
1
| - <script src="/js/countdown.js"></script>
|
完成了步骤 2.1 后我们来为小卡片添加 html 倒计时器组件。在博客的 /source/ 目录中的 _data 文件夹中创建一个名为 widget.yml 的文件(_data 文件夹是一个数据存储目录,用来存放网站的各种结构化数据。同上,如果你没有 _data 文件夹可以自行创建一个)。目录和文件创建好后,在 widget.yml 文件中添加以下代码:
1
2
3
4
5
6
7
8
9
10
11
12
13
| top:
- class_name: card-countdown
id_name:
name:
icon:
html: |
<div class="cd-count-left">
<span class="cd-text">距离</span>
<span class="cd-name" id="eventName"></span>
<span class="cd-time" id="daysUntil"></span>
<span class="cd-date" id="eventDate"></span>
</div>
<div id="countRight" class="cd-count-right"></div>
|
1.3 结束语
最后 Hexo 三连(hexo cl && hexo g && hexo s)就可以在页面侧边栏查看效果了。
但值得注意的是,步骤 2.1 中的 targetDate: "2026-02-17", 这部分(第 3 行)js 代码每年需要手动更新一下日期,如果忘记更新的话,年月日倒计时功能不受影响,只是距离春节天数会变为负数。
最后最后,欢迎大家在评论区给予指正,让我们共同打造快节奏时代不受算法牵制的属于我们自己的小空间!